CORE WORKFLOWS
Investigate
Run read-only investigations, preserve configuration history, compare snapshots, and identify configuration drift.
Verified against AI NetShell 0.4.15
Purpose#
Use Lina, the AI NetShell assistant, to inspect open device sessions, collect read-only evidence, isolate a fault when the evidence supports one, and identify the next useful checks when it does not. Use Config & Compliance to preserve configuration evidence, compare retained snapshots, and investigate drift.
Investigate does not apply configuration changes. A finding may describe a fix, but sending a governed change is a separate Resolve workflow with its own preview and approval.
Before You Begin#
Complete Set up AI, add at least one supported device, and open its terminal. Use an account and Credential with only the read permissions needed for the investigation.
Included AI investigations, including those across many open devices at once, use AI credits on every tier. Free uses prepaid pack credits. Paid tiers use their monthly AI credits first, then pack credits as a top-up. Your own AI still requires Investigate or higher.
Choose a focused question and identify the devices that should be in scope. Broad questions across many terminals can consume more time, provider usage, and AI credits.
Manual backup for one device at a time and configuration comparison are available on Free. Active Discovery, discovery backups, scheduled discovery, and drift alerts require Investigate or higher.
Steps#
1. Open the device sessions to investigate#
- In Inventory, double-click the first device.
- Open additional terminals in the same tab if the question spans both ends of a link.
- In Lina's scope bar, review AI watches.
- Keep This tab for the terminals in the active tab, or select All terminals only when every open terminal should be included.
A new investigation returns to the narrower tab scope. The app does not silently add unopened devices.
2. Choose how read commands are approved#
Use the read-approval control in the row below the composer:
- Confirm each read: Review each new read-only command before it runs.
- Approve investigation plan: Approve the listed read-only steps once. New steps still require another approval.
- Auto-approve permitted reads: Permitted read-only commands run without another click. Commands that change device state still stop for approval.
This setting changes read friction only. It does not allow configuration changes.
3. Ask a focused question#
- Enter a question in Ask Lina a question.
- Select the model for this message if needed.
- Select Send.
- While Lina works, Send becomes Stop. Use it to interrupt the run when needed.
- Watch the conversation as Lina answers. Tool and result rows show the reads and returned evidence. A quiet status line explains whether she is starting, responding, or reviewing a result.
- If an approval card appears, review the device and command. Select Approve & run to allow it or Skip to continue without that output. A batch card shows a count, and reads that are already permitted run without appearing on the card.
The device output still appears in the terminal. The model receives a bounded, redacted copy of the output selected for the investigation.
4. Understand the collected information#
The conversation keeps your questions, Lina's answers, and the tool and result rows that show which commands ran. Findings for the active device appear in the terminal's Findings & Fixes panel. A finding can include supporting evidence and a proposed fix. When one problem needs the same fix on several interfaces of a device, Lina files one finding with one fix, for example a VLAN missing from both uplinks. Lina keeps unrelated problems on the same device as separate findings. An empty panel says that there are no active findings for the device and that this is not a clean bill of health.
Each finding is one row. The most serious open finding shows its details, and one open finding shows its details at a time; select another row's chevron to open it instead. When the open findings cover several devices, they are grouped under each device's name. The counts at the top of the box use the same words as each finding's badge, for example 1 high and 2 medium.
An open finding shows Observed with where it came from: Confirmed by the app when the app checked it against its own readings of the device, Lina's conclusion when it is her reasoning over what she read, or Confirmed earlier, not re-checked when the app confirmed it earlier in the case but cannot re-confirm it from the latest readings. Hover the label for the full sentence. The evidence reads one fact per line, with quoted commands shown as code. Longer evidence shows its first two lines and a Show n more button.
At the bottom of the box, Informational holds Lina's notes that are not problems, and Closed holds the findings you marked Fixed or Not relevant and the ones the app retired. Both stay folded until you open them. A finding that opens again after a rollback says when the change was rolled back.
For a problem investigation, Lina ends with one conclusion under Checked, Finding, Explanation and Next. Checked, Finding and Explanation each start on their own line, with one point per line. Her recommended next steps appear under her answer as Pick a next step: numbered options, each with its command and any reason Lina gave, plus Ask Lina something else, which puts the cursor in the message box and sends nothing. While Lina is still working, the options wait until she is done. Once you pick a step, the card shrinks to one line, You picked, that shows what runs.
Some fixes change settings that AI NetShell cannot check after a change, such as HSRP settings, OSPF interface settings, port-channel membership, or duplex settings on Arista EOS. Lina still files these fixes. Each one is marked Manual change and carries a sentence such as "AI NetShell cannot check HSRP settings after a change. If you apply this fix, confirm the result on the device yourself." Technical notes, Copy for a ticket and Copy for an email include the same sentence.
If Lina needs a decision or more detail, answer her clarifying question in the same conversation. A waiting strip keeps that request visible. If a safety limit pauses the run, read the explanation and select Continue only when you want Lina to resume from that point.
If the conversation says Earlier updates were truncated (n events beyond the replay buffer)., some earlier live updates are no longer shown. Let the run settle, then use Export > Technical notes for the recorded case and evidence. Do not repeat a read only because an earlier live update is missing.
For supported show commands, the host can attach a parsed table below the raw command result. You can filter rows, sort by a column, and use CSV to copy the current table or download it when clipboard access is blocked. Parsing is an extra view of output the device already returned. If the output does not match a supported shape, the raw text remains available and no table is shown.
5. Ask follow-up questions or start a new case#
Ask follow-up questions in the same conversation when they depend on the evidence already collected. The case keeps its active findings and prior context.
When the work is complete, select New investigation to save the current findings to a case note and start fresh. Confirm with Save & start fresh. The conversation then shows Case note saved. with an Open folder button. File Explorer opens only when you select it. Discard is the hard reset that throws away the current case without saving it, after a confirmation.
To share or inspect the settled record, open Export and choose one current output:
- Technical notes saves a Markdown file with the full record and evidence.
- Executive summary saves a shorter Markdown file for a manager or client.
- Copy for a ticket places plain text on the clipboard.
- Copy for an email places an email-formatted version on the clipboard, or explicitly reports when only plain text could be copied.
The app redacts the exported fields again. The first time you save a note, the app asks which folder to use and remembers it; the default is Documents\AI NetShell\case-notes. After a save from Export, Notes saved names the file, and Open folder shows it in File Explorer. To change the folder later, open Settings > General > Notes save location and select Change or Reset to default. Saved notes carry the AI NetShell watermark, the line Made with AI NetShell · ainetshell.com, except on a paid Resolve or Resolve 6K month. When Lina's report names a device she did not read, the saved note says which devices were not read. When the app applied a change for the case, the note says which change it was and what happened to it, for example rolled back. Review the resulting file or clipboard content before sharing it.
6. Worked example: investigate a down interface#
- Open the terminal for the affected device.
- Under Troubleshooting, choose Why is this interface down?, or enter the same question with the interface name.
- Review each proposed read and allow only commands for the intended device.
- Review the tool and result rows to confirm that Lina collected interface state and the related evidence requested.
- Review Findings & Fixes for the active device and compare each finding with the terminal evidence.
- If Lina explains that evidence is missing, ask a focused follow-up question instead of treating the first explanation as final.
The result may be a proven finding, a candidate explanation, or an evidence gap. The app does not apply the suggested configuration fix during this workflow.
7. Worked example: check uplinks across open terminals#
- Open the relevant device terminals.
- Set AI watches to This tab if all target terminals are in one tab, or All terminals only after reviewing every open terminal.
- Ask
Any errors, drops, or flapping on the uplinks? - Review the tool and result rows by device to confirm coverage.
- Compare Lina's answer and Findings & Fixes with the terminal evidence. A missing reading on one device means the conclusion is incomplete for that device.
This example uses the shipped troubleshooting starter and the app's multi-session scope. It does not assume a fault exists before evidence is collected.
Active Discovery and topology#
Start a crawl from Discovery#
Active Discovery begins at Investigate. It connects only to advertised addresses inside the scope you authorize.
- Select Discovery in the left navigation rail.
- Select Start a crawl. After a completed run, the same control is New crawl.
- Under Seed device, choose an enrolled device. To start from an address instead, select Seed from a raw IP instead, enter a literal address under Seed IP (a literal address; a crawl never resolves a hostname), and choose a Vendor command bundle.
- Under Include scope (optional), enter one address, CIDR, or address range per line when you want to restrict the run, such as
10.0.0.5,10.0.0.0/24, or172.31.200.50-60. A single address is saved as that one host,10.0.0.5/32(/128for IPv6), and the field shows it that way when you leave it. Leave it empty only when every private address advertised by a device is authorized. Public addresses are never connected to unless you list them. Use the seed's subnet can fill the field. - On the first run, review Discovery credentials, tried in priority order. Later runs show a one-line credential summary; select Change to edit it. Use + Add credential and the move controls to set the order. If the list is blank for an enrolled seed, the seed device's saved Credential is used throughout. Otherwise, another Credential is tried only after a genuine authentication rejection.
- Open Advanced if you need to change the defaults. Back up configuration: capture running and startup config over the same approved survey connection controls discovery backups and starts selected. Review each hop before it is dialed (instead of the unattended crawl) changes the approval style.
- Select Authorize and start crawl for an unattended run to completion. If review-each-hop mode is selected, use Start crawl (review each hop) and approve only the intended rows.
A run collects Cisco Nexus (NX-OS) and Arista EOS switches the same way as other supported devices. An Arista switch is recorded by its hostname. On a Cisco Nexus switch, discovery moves on from each configuration read once the switch's prompt comes back.
During a run, Discovery shows live attempted, reached, refused, planned, and in-progress counts. Crawl activity lists timestamped per-device activity, including each read as it starts, shown as reading command (n of m). Use Filter by device to narrow it. Scrolling away from the newest event shows Paused. Jump to newest; use that control to resume following.
If the observed progress does not change for a long time, the app says: No progress for time. A slow device or a configuration backup read can take several minutes, so this may still be working; if nothing changes for much longer, kill the crawl and check the batch report. Use Crawl actions > Kill crawl only after allowing for the slow operation described in that notice.
When the run ends, the completion line names each neighbour it found but could not reach, with the reason, for example Crawl complete. Found 4 devices. 1 neighbour could not be reached: C9K-ACC2.lab.local (no management address). The reasons are no management address, connection failed, sign-in refused, host key not yet trusted, host key mismatch, host key needs re-approval, and a command was not permitted. The line names up to three neighbours; with more, it ends The report names each one. A run with a neighbour it could not reach is marked incomplete, and its report shows INCOMPLETE CRAWL: coverage is limited; review the coverage limitations before relying on this report. A neighbour advertised by name only, with no address, inside your include range is named too, but discovery does not try to connect to it.
Review devices and add them to Inventory#
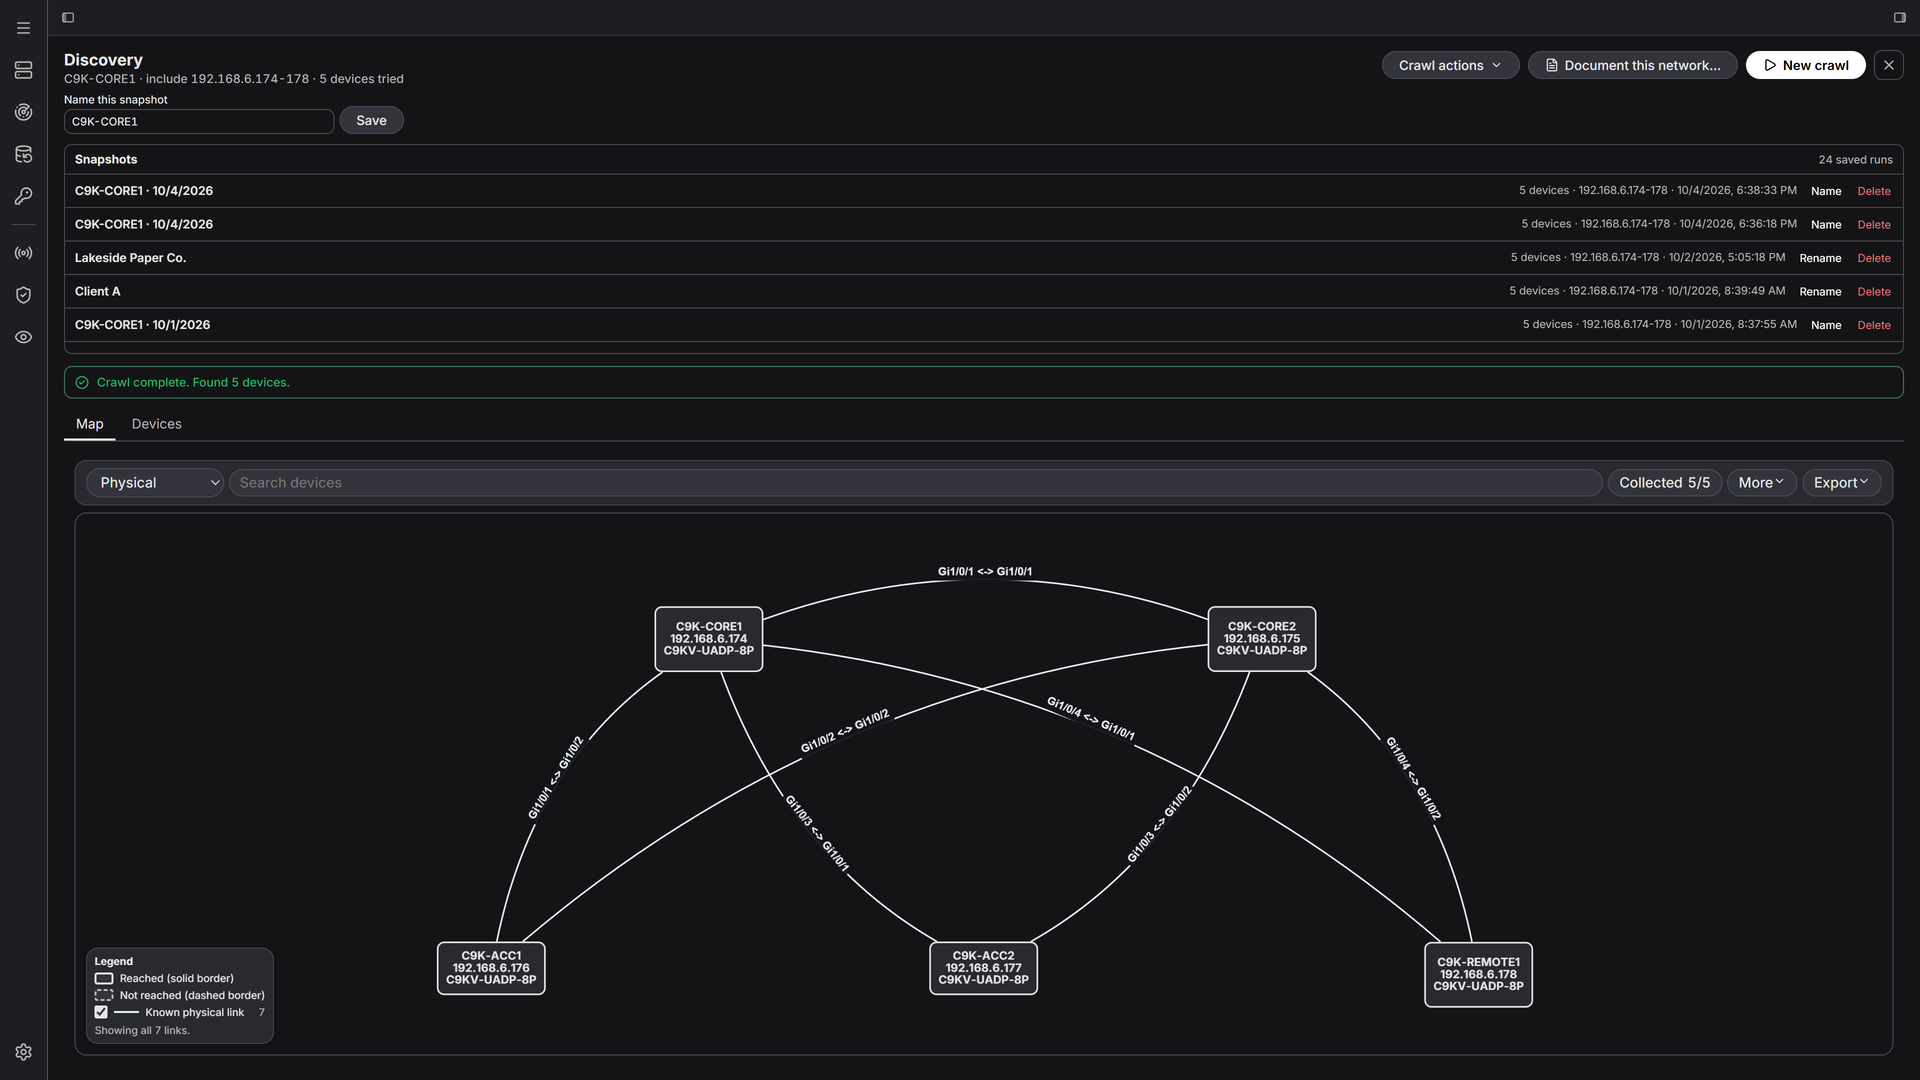
When the run completes, Discovery presents Map and Devices tabs. Devices shows one row per device. Review Device, Found via, Status, model, serial, lifecycle dates, Lifecycle match, and Actions. A row can show one primary origin plus additional recorded origins. A reached endpoint that did not yield an identity is labeled Found, not identified.
The line above the table reads n discovered · n partial · n lifecycle unknown · n unknown model. A device counts as partial only when part of its data is missing, and its Status cell names what is missing, such as Partial: the running-config backup did not finish with the reason. A device whose lifecycle match is unknown is counted under lifecycle unknown, not as partial.
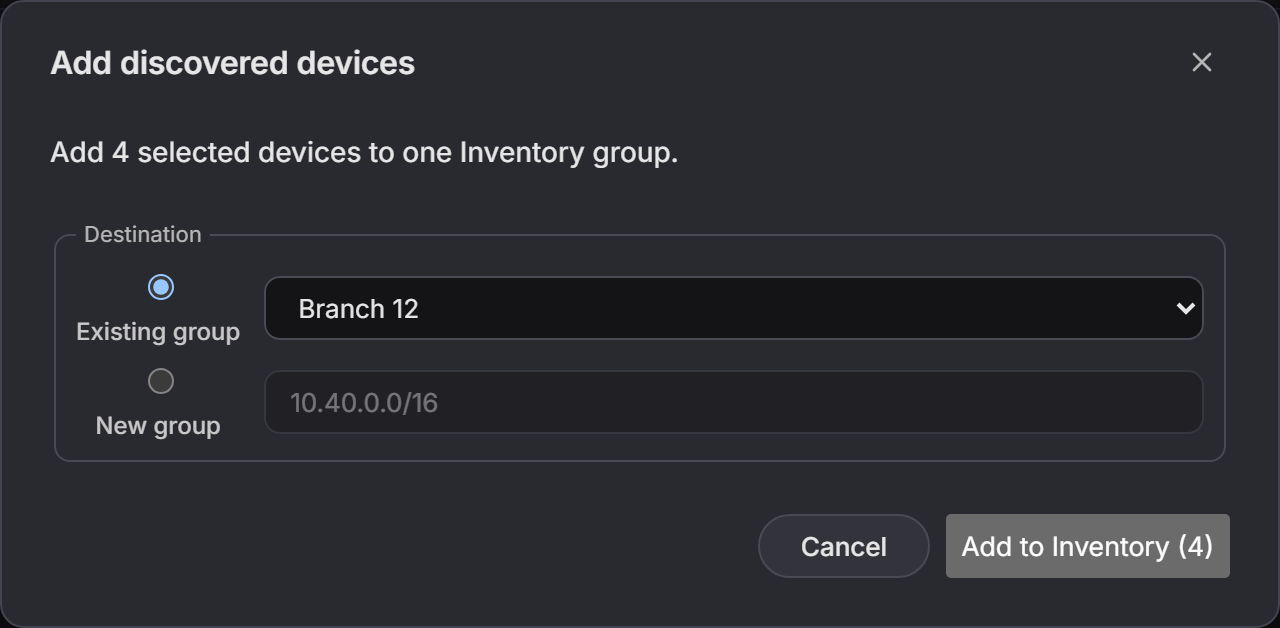
To add reached, identified devices:
- Select the intended rows in Discovered devices.
- Select Add to Inventory (n).
- In Add discovered devices, choose Existing group or New group.
- Select Add to Inventory (n). If the run did not fully cover the selected devices, review the acknowledgement and use Add anyway (n) only when you accept the incomplete evidence.
- Review Inventory results for each device. A successful row changes to In Inventory with its group. Skipped, refused, and failed rows remain explicit instead of being counted as added.
Reopen or document a snapshot#
The Discovery home lists completed runs under Snapshots. Give a run a useful name, select the run's name to reopen it, or select Delete and confirm Delete snapshot? to remove it. A snapshot that contains only map data does not show the Devices tab.
After the app restarts, Discovery opens on its home page instead of the last run, without an error. Reopen a completed run from Snapshots. Discovery also opens on its home page next time when you close it with Back to the workspace or Esc while the run's results are already listed under Snapshots. A run that is still going, or one stopped part way, stays open instead. If an action refers to a run the app no longer holds, the app says That crawl is no longer open in this app. Its saved results are under Snapshots.
This Discovery section is separate from Config & Compliance > Snapshots, which holds configuration captures.
On Resolve or Resolve 6K, including the Resolve trial, open a completed run and select Document this network…. Choose the sections to include. The app saves an as-built folder containing the selected PDF report, tables, configurations, and a manifest. Word export is paused in this version, so the folder has no Word file on any plan.
The report opens with a dark cover band that carries the AI NetShell logo, during the trial and on a paid month alike. That logo is not the watermark: on a paid Resolve or Resolve 6K month the report has no Made with AI NetShell · ainetshell.com line; it ends with the line Prepared with AI NetShell · ainetshell.com. Tables have colored header rows and striped rows. Status cells, such as backups, end of support, interface status, and routing neighbor state, show their word in a colored chip, so a black-and-white print still reads. The contents page has page numbers and lists every figure and table. Spanning tree is shown per VLAN, with the root bridge and any blocked ports, and every port each switch reported is in an appendix. Subnets and addresses use CIDR notation, such as 10.10.10.0/24, and an OS versions section lists each operating system version in use and the devices that run it. The routing figure uses the same layout as the Routing map view, with its legend beside the drawing. A site with no routing gets the legend and a No routing on: line that names its devices.
Use the map and its layers#
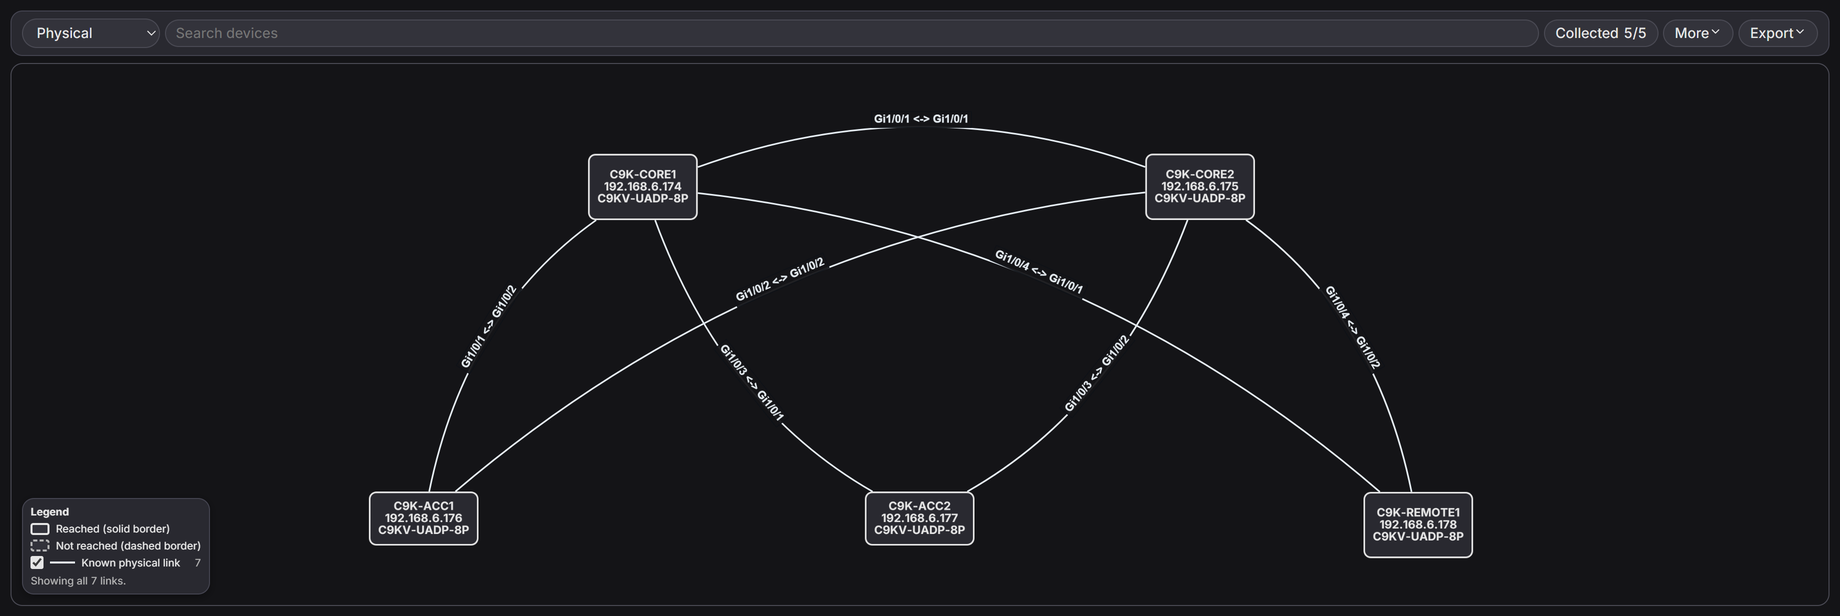
Select Map inside Discovery for the completed run.
- In the layer selector, the first control in the map toolbar, choose Physical, Spanning Tree, or Routing. A layer without facts from this run is marked (no data).
- On Spanning Tree, use the VLAN selector or All VLANs to inspect the root bridge and per-VLAN state.
- Use Search devices to find a card. Select Collected to open Collection details for the reached and mapped counts.
- Use the map legend to show or hide edge kinds. Pan by dragging and zoom with the mouse wheel.
- Open More for Reset view and the control that shows or hides hidden devices.
- Open Export for Map image (.png), Printable map (.pdf), Network report (.pdf), and Device tables (.csv). The menu displays the required plan beside each item.
Map image (.png), Printable map (.pdf), the network reports and device tables require Resolve or Resolve 6K; on Investigate, maps are viewed on screen. During the Resolve trial, exports carry the AI NetShell watermark, the line Made with AI NetShell · ainetshell.com; a paid Resolve or Resolve 6K month removes it.
On Investigate, the Export items and Document this network… are still shown, but locked. This also applies to saved runs. They carry one line and a link to change your plan. The line reads Exports and documentation are part of Resolve.
If a map is too large to save as one image, Map image (.png) and Printable map (.pdf) save nothing and show: This map is too large to save as one image. View it on screen, or run discovery on a smaller scope to save it. The network reports and the as-built folder from Document this network… are still saved. They print the same sentence where the map would be.
Use Crawl actions in the Discovery header for Reload results, Kill crawl while a run is in progress, Run alerts, Refresh known devices, Schedule refresh, and Compare with previous run when those actions are available.
Read the Routing view#
Select Routing in the layer selector to see which routers peer with which.
- Your routers sit in the middle, in a frame labeled with your AS or OSPF area. Other peers sit on a ring beside the router they peer with.
- A peer that is not on the map shows its address and not on map, with its AS when one was read. The legend calls it Peer not on this map.
- Line style shows the protocol. Under Protocol (line), the legend lists each protocol the run found, such as OSPF (a thick solid line), iBGP (a thin solid line), and eBGP (a dashed line). Clear a protocol's checkbox to hide those sessions. Saved images and printable maps still include every session.
- Line color shows the session state. Under Session state (colour), the legend lists Up: FULL, Established, Forming, or the ends differ, and Down: Idle, DOWN, plus Other state, or not read when the map draws such a session.
- If the two ends of a session report different states, the line shows both colors and its label keeps both words.
- Each pair of routers has one label, with one row per session. Two sessions between the same pair are drawn as two lines. Hover a line to see both ends' own words.
- Devices with no routing and devices whose routing was not read are listed separately in a strip under the map, as No routing on n devices and Routing not read on n devices. Select Hide to put the strip away. The app remembers your choice, and a button such as Show n devices with no routing brings the strip back.
Config & Compliance#
Back up one device manually#
Free includes manual backup for one device at a time. A backup reads the current running configuration from a supported, connected network device. It does not change the device.
- Open the device terminal.
- Right-click the device in Inventory and select Config history…. You can also right-click in its terminal and select Back up config.
- In History, select Back up config.
- Open Config & Compliance > Snapshots, then select the device to see the new entry labeled manual.
An open Snapshots list or Change timeline for the device refreshes right after a manual backup, a post-change backup, a scan, or a connect baseline, so you do not need to reopen it.
The app rejects an unsupported backup command, a device error, or an incomplete capture instead of storing it as a valid snapshot. Manual and governed pre-change snapshots are redacted when captured.
Capture configuration during Active Discovery#
Investigate and higher can add configuration backup to a discovery run:
- Open Discovery and select Start a crawl or New crawl.
- Review the seed, Include scope (optional), and credential summary. Select Change if you need to edit the ordered list.
- Under Advanced, leave Back up configuration: capture running and startup config over the same approved survey connection selected.
- Start the run with the intended approval style.
- Review the completion report for Config backed up, Backup unsupported, Backup failed, Backup not captured (needs a privileged account), Backup not captured (the device rejected the read), and Unsaved config changes.
For each supported device, the run captures the running configuration and, when the platform keeps a separate saved state, the startup configuration over the same approved survey connection. The complete per-device set is stored together. If a required capture fails, no partial set is stored. Unsupported vendors are reported without guessing a command.
If the device account can sign in but the device refuses the configuration read, the device is still added to the map and the report. Nothing is stored for a refused read, and any configuration the device did return is kept. The completion report counts the device under Backup not captured (needs a privileged account), and the network report adds the finding Some configurations were not backed up: the account used cannot read them. Use an account that can read the configuration if you need the backup.
Discovery backups are restore-grade captures stored encrypted in the Snapshots list. Their raw configuration is excluded from AI-facing context. This is different from the redacted snapshot used to preview a governed change.
Review the time machine and compare configurations#
- Open Config & Compliance > Snapshots and select a device.
- Review the source label on each point: manual, pre-change, post-change, discovery · running, discovery · startup, connect baseline · running, or connect baseline · startup. A connect baseline is a copy the app took by itself when you connected to the device. A post-change point is a read-only backup of the running configuration that the app tries to take right after a governed change settles (verified, kept, or rolled back by the app) on Cisco IOS, IOS XE, NX-OS, Arista EOS, and Palo Alto PAN-OS. When it is stored, the Change timeline shows the change straight away. If the device is busy or disconnected, or the read fails, no post-change point appears; select Back up config to bring the timeline up to date. The per-device History view uses the same labels.
- Select any two points. The older point becomes A and the newer point becomes B.
- Select Compare A ↔ B to open the rich configuration comparison.
The per-device History view also filters the timeline by all points, the last 24 hours, the last 7 days, or since last Tuesday. A comparison always runs from the older capture to the newer capture. Known presentation noise is reported separately, and the whitespace option changes only how the comparison is displayed.
By default, the app keeps up to 200 snapshots per device. To change that, open Settings > History and set Max snapshots per device. A value you saved there before is kept.
Each saved device has one history. Discovery adds its backups to your saved device's history when it can link the device it found to that saved device. It links them only when the saved device is in the same folder as the device discovery started from, or in a folder inside it, and the address, port and name all match. Devices that discovery could not link are listed separately under Found by discovery, not linked to a saved device, marked with their folder, such as Folder: name, or No folder. A discovery started from an address, not from a saved device, does not link the devices it finds. They are marked Started from an address. Histories from earlier versions are not changed, moved or deleted. An older history saved by name is shown alongside, marked Saved by name before this version. In a saved device's own list, older captures saved under its name are marked saved by name.
Scan for drift and review attribution#
With at least two retained snapshots for a device:
- In Config & Compliance > Snapshots, select the device.
- Select Scan for unexplained changes. The scan compares each retained point with the one before it, running configuration with running and startup with startup.
- Review the number of added and removed configuration lines.
- Open Change timeline to see each changed interval and select View change when you need the exact lines.
A transition is labeled Governed change when its older point is a pre-change capture recorded by the governed workflow. That capture is taken when a proposal is created, so the label means a governed proposal captured the before state; the linked change record shows whether the change was then approved and applied. When a matching audit record is available, the timeline links it. The card shows the operator, the recorded intent in plain words with each sentence on its own line, and the outcome. Select View change for the exact configuration lines. A changed interval without a governed pre-change capture is labeled Unexplained · out-of-band.
When AI NetShell rolls back an approved change on a Cisco IOS, IOS XE, NX-OS, Arista EOS, or Palo Alto PAN-OS device and the device confirms it, the timeline can label that interval Governed rollback. The entry says which change was rolled back, who rolled it back, the change's intent, and the rollback lines, and Scan for unexplained changes does not count it. A hand edit made after the rollback still shows as unexplained, and so does a rollback that did not complete. For a change to several interfaces or to other parts of the configuration, and for any change on Palo Alto PAN-OS, the label also needs a backup taken between the change and its rollback, such as the post-change backup.
Discovery backups and connect baselines are stamped with the time each configuration was read from the device, not the time the set was stored. A governed change you approved while a discovery run or a connect baseline was reading the device therefore lands in the correct interval and is not shown as unexplained.
Drift detection compares retained points. It does not compare the newest snapshot with the live device, so a change made after the newest capture cannot appear until another manual, discovery, pre-change, or post-change point is recorded.
Schedule discovery and review drift alerts#
Scheduled discovery and drift alerts begin at Investigate:
- Complete an Active Discovery run and open it in Discovery.
- Open Crawl actions, then select Schedule refresh.
- Under Profile, choose the saved authentication profile for the known devices.
- Set Schedule to Daily or Weekly, then select Save schedule. Use Off to stop scheduled runs.
- For an immediate re-check, open Crawl actions, select Refresh known devices, choose Profile, then select Refresh known now.
- Open Crawl actions > Run alerts to review unread alerts. Select Mark all read after you have handled the records currently on screen.
A scheduled run re-checks the known devices already recorded for that workspace. It uses the same pinned planning, saved scope, authentication checks, and discovery executor as a manual refresh. A run that cannot complete is recorded under Scheduled runs that did not complete rather than presented as a successful check.
Each alert compares the new running-config backup with the most recent earlier backup for the same authenticated endpoint in the same workspace. It shows the device, detection time, and lines added and removed, then Explained by a governed change or No governed change recorded. An alert is explained only when every change it covers is an approved change to a single interface on a Cisco IOS, IOS XE, NX-OS, or Arista EOS device, or a rollback that AI NetShell made and the device confirmed. Any other change reads No governed change recorded, including an approved change to several interfaces or to other parts of the configuration. An alert carries only counts, not the changed lines, so it is stricter than the change timeline on purpose, and the timeline can still show such a change as governed. When discovery links a device it reached through a neighbor to your saved device, the alert names your saved device and reads the same history as its change timeline. A device that is not linked, including every device found by a discovery started from an address, keeps its own history under the name discovery found for it, and its alerts read No governed change recorded. A scheduled run detects drift and raises the alert, but it does not identify who made the change. Open Change timeline for the device to see the operator, the recorded intent, and whether the change came through the governed workflow. With no matching earlier point, there is no honest baseline and no drift alert is created.
Check configuration references#
For Cisco IOS and IOS XE, ask Lina to check the full running configuration for undefined references. The host-side reference check can find modeled cases such as a route map referring to a missing prefix list or ACL, a BGP neighbor using a missing route map, or an interface applying an absent access group.
Use the full show running-config output, not a section-only capture. A partial capture can omit a definition that exists elsewhere. Unmodeled reference types are ignored rather than guessed, so zero findings is not a complete configuration health certificate.
Expected Result#
Lina answers the question from redacted output collected from the selected open sessions. Tool and result rows preserve the conversation's command evidence, Findings & Fixes shows active findings for the selected device, and Export produces the settled case record. Config & Compliance preserves the available snapshot sources, compares selected points, and distinguishes governed changes from unexplained drift when the retained evidence supports that conclusion.
Troubleshooting#
Send is unavailable#
Open at least one device session and enter a non-empty question. The regular AI paths cannot investigate a device with no session in scope.
A read waits for approval#
Review the current read-approval mode. Confirm each read asks every time, and Approve investigation plan asks for the listed plan. A state-changing diagnostic also requires approval even under Auto-approve permitted reads.
Lina stops with insufficient evidence#
Read Lina's explanation and the available tool results. Ask a focused follow-up question in the same case to collect the missing evidence.
A conclusion does not match the terminal#
Check the tool and result rows, Findings & Fixes, and whether output was partial or unavailable. Do not act on a candidate explanation as if it were proven. Ask for a narrower read or verify directly on the device.
A read does not run while a change is in progress#
While AI NetShell applies or rolls back a change on a device, or checks the device after a change, Lina's reads on that device wait for it to finish, up to 1 minute. A read that cannot start in that time is not sent. Ask again after the change finishes.
The wrong terminals are in scope#
Stop the run if needed, correct AI watches, and start a new investigation. Review the session names shown in the scope bar before selecting Send.
If Lina cannot include every open terminal, the notice states how many terminals Lina is reading. Select Open account settings when the notice says the account must be connected. If the notice identifies a plan boundary, use its plan link: See plans & pricing when you have no paid plan, Change plan to open your billing portal when you already pay for one, or Plans and billing to open your account page when the app cannot tell yet. You can also continue with the terminals the notice says Lina is reading.
Back up config is unavailable or fails#
Open a live terminal for the network device and try again. The selected vendor must have a supported configuration capture command, the device account must be able to run it, and the device CLI must return a complete result. The app does not store a timed-out, partial, empty, or rejected response as a backup. If a change, a rollback or another read is using the device session, the backup waits up to 1 minute. If the session is still busy, nothing is sent and the app says This session is busy (task). Try again in a moment.
A drift scan reports no changes#
Confirm that the timeline contains at least two captures taken after the states you want to compare. A scan does not read the live device. Capture another point if the newest device state is not yet represented.
A scheduled run did not complete#
Open Discovery > Crawl actions > Run alerts, expand Scheduled runs that did not complete, and read the recorded reason. Check that the schedule is still on, its authentication profile still exists, the saved scope and run record are intact, and no other run is active. The recorded skip means the app did not establish a complete comparison for that interval.